Difference between revisions of "The Dragon Roars Gallery"
Sarna News


m (...work in progess) |
m |
||
| Line 1: | Line 1: | ||
<gallery> | <gallery> | ||
| − | Image:The Dragon Roars (1).jpg|Illustration by | + | Image:The Dragon Roars (1).jpg|Illustration by [[John Paul Lona]] '97 |
| − | Image:The Dragon Roars (2).jpg|Illustration by | + | Image:The Dragon Roars (2).jpg|Illustration by John Paul Lona '97 |
| − | Image:The Dragon Roars (3).jpg|Illustration by | + | Image:The Dragon Roars (3).jpg|Illustration by ?? |
| − | Image:The Dragon Roars (4).jpg|Illustration by | + | Image:The Dragon Roars (4).jpg|Illustration by [[Mike Chen]] '97 |
| − | Image:The Dragon Roars (5).jpg|Illustration by | + | Image:The Dragon Roars (5).jpg|Illustration by Mike Chen '97 |
| − | Image:The Dragon Roars (6).jpg|Illustration by | + | Image:The Dragon Roars (6).jpg|Illustration by John Paul Lona '97 |
| − | Image:The Dragon Roars (7).jpg|Illustration by | + | Image:The Dragon Roars (7).jpg|Illustration by [[Scott James]] '97 |
| − | Image:The Dragon Roars (8).jpg|Illustration by | + | Image:The Dragon Roars (8).jpg|Illustration by ?? |
| − | Image:The Dragon Roars (9).jpg|Illustration by | + | Image:The Dragon Roars (9).jpg|Illustration by John Paul Lona '97 |
| − | Image:The Dragon Roars (10).jpg|Illustration by | + | Image:The Dragon Roars (10).jpg|Illustration by John Paul Lona '97 |
| − | Image:The Dragon Roars (11).jpg|Illustration by | + | Image:The Dragon Roars (11).jpg|Illustration by [[Shane White]] |
| − | Image:The Dragon Roars (12).jpg|Illustration by | + | Image:The Dragon Roars (12).jpg|Illustration by Mike Chen '97 |
| − | Image:The Dragon Roars (13).jpg|Illustration by | + | Image:The Dragon Roars (13).jpg|Illustration by [[Loston Wallace]] |
| − | Image:The Dragon Roars (14).jpg|Illustration by | + | Image:The Dragon Roars (14).jpg|Illustration by Loston Wallace |
| − | Image:The Dragon Roars (15).jpg|Illustration by | + | Image:The Dragon Roars (15).jpg|Illustration by ?? |
| + | Image:The Dragon Roars (16).jpg|Illustration by ?? | ||
| + | Image:The Dragon Roars (17).jpg|Illustration by Loston Wallace | ||
| + | Image:The Dragon Roars (18).jpg|Illustration by Loston Wallace | ||
| + | Image:The Dragon Roars (19).jpg|Illustration by ?? | ||
| + | Image:The Dragon Roars (20).jpg|Illustration by Loston Wallace | ||
| + | Image:The Dragon Roars (21).jpg|Illustration by Loston Wallace | ||
</gallery> | </gallery> | ||
[[Category:Galleries]] | [[Category:Galleries]] | ||
Revision as of 15:08, 12 April 2010
- The Dragon Roars (1).jpg
Illustration by John Paul Lona '97
- The Dragon Roars (2).jpg
Illustration by John Paul Lona '97
- The Dragon Roars (3).jpg
Illustration by ??
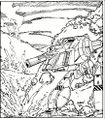
Illustration by Mike Chen '97
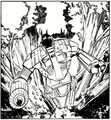
Illustration by Mike Chen '97
- The Dragon Roars (6).jpg
Illustration by John Paul Lona '97
- The Dragon Roars (7).jpg
Illustration by Scott James '97
- The Dragon Roars (8).jpg
Illustration by ??
- The Dragon Roars (9).jpg
Illustration by John Paul Lona '97
- The Dragon Roars (10).jpg
Illustration by John Paul Lona '97
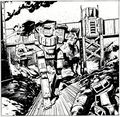
Illustration by Shane White
- The Dragon Roars (12).jpg
Illustration by Mike Chen '97
- The Dragon Roars (13).jpg
Illustration by Loston Wallace
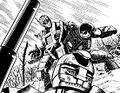
Illustration by Loston Wallace
- The Dragon Roars (15).jpg
Illustration by ??
- The Dragon Roars (16).jpg
Illustration by ??
- The Dragon Roars (17).jpg
Illustration by Loston Wallace
- The Dragon Roars (18).jpg
Illustration by Loston Wallace
- The Dragon Roars (19).jpg
Illustration by ??
- The Dragon Roars (20).jpg
Illustration by Loston Wallace
- The Dragon Roars (21).jpg
Illustration by Loston Wallace
.jpg)
.jpg)
.jpg)
.jpg)